
Is your camera not working? A malfunctioning camera can be incredibly frustrating, especially when you need to capture a special moment. Whether you’re dealing with a digital camera, a smartphone camera, or a webcam, this troubleshooting guide will provide practical solutions to help you diagnose and fix common camera problems. We’ll cover everything from basic troubleshooting steps like checking power and connections, to more advanced solutions involving software and hardware. Learn how to identify the underlying cause of your camera issues and get your camera back in working order.
This comprehensive guide offers a range of troubleshooting techniques for various camera types. From blurry images and error messages to completely unresponsive cameras, we’ll address a variety of scenarios. We’ll guide you through each step, offering clear instructions and helpful tips. Whether your camera is freezing, displaying a black screen, or experiencing connectivity issues, you’ll find valuable information here to help you troubleshoot and potentially resolve the problem yourself, saving you time and potentially costly repairs.
Common Reasons Why Your Camera Isn’t Working
Several factors can cause camera malfunctions. Understanding the root cause can often lead to a quick fix. Here are some of the most frequent culprits:
Software Issues
App conflicts can sometimes interfere with camera functionality. Similarly, outdated software, either the operating system or the camera app itself, can cause problems.
Hardware Problems
A faulty camera lens or damaged camera sensor are potential hardware issues. Connection problems between the camera module and the device’s motherboard can also prevent the camera from working correctly. Low battery can sometimes temporarily disable power-intensive features like the camera.
Permissions and Settings
Incorrect camera permissions can prevent apps from accessing the camera. Incorrect camera settings, such as an inadvertently selected wrong camera mode, can also lead to apparent malfunctions.
Basic Troubleshooting Steps
Before delving into more specific solutions, try these fundamental troubleshooting steps. Often, a simple fix can resolve camera issues.
Check for Obstructions
Ensure there’s nothing blocking the camera lens. This includes cases, screen protectors, or even dirt and debris. Gently clean the lens with a soft, dry cloth.
Try a Different Camera App
If you primarily use a third-party camera app, try using your device’s built-in camera app. If the built-in app works, the problem lies with the third-party app, not the camera itself.
Test in Safe Mode (Android)
For Android users, booting into safe mode disables third-party apps. This can help isolate whether a conflicting app is causing the camera problem. If the camera works in safe mode, a recently installed app might be the culprit.
Checking for App Permissions
Sometimes, your camera might not function correctly due to restricted app permissions. It’s crucial to ensure the camera app has the necessary permissions to operate. The process for checking and enabling permissions might vary slightly depending on your device’s operating system (e.g., Android or iOS).
For Android devices: Typically, you can navigate to your device’s Settings, then select Apps or Applications. Find the Camera app in the list of installed applications. Tap on Permissions and ensure the camera permission is toggled on.
For iOS devices: Go to Settings, then scroll down and select Privacy. Choose Camera and verify that the app you’re trying to use has permission enabled.
If the permission was previously disabled, enabling it should resolve the camera issue. After enabling the permission, try using your camera app again.
Clearing Camera App Data and Cache
Sometimes, corrupted data or a full cache in the camera app can cause malfunctions. Clearing the app’s data and cache can often resolve these issues. Be aware that clearing data will reset the camera app’s settings to default, such as resolution and location tagging.
The process for clearing app data and cache varies slightly depending on your device and operating system. Generally, you can find these options within your device’s settings menu. Look for “Apps” or “Applications,” then select the camera app from the list. Within the app’s information page, you should find options to clear both the data and cache.
Here’s a generalized approach:
- Open your device’s Settings.
- Navigate to Apps or Applications.
- Find and select your Camera app.
- Tap on Storage.
- Tap Clear Cache and then Clear Data (or similar options).
After clearing the data and cache, restart your camera app and check if the issue is resolved.
Restarting Your Device
Sometimes, the simplest solution is the most effective. A simple restart can often resolve temporary software glitches that might be interfering with your camera’s functionality. This process closes all running applications and refreshes the operating system.
To restart your device, follow these steps:
- Press and hold the power button on your device.
- A menu should appear with options such as Power Off, Restart, or similar. Select the Restart or equivalent option.
- Your device will power down and restart automatically. After it restarts, attempt to use your camera again to see if the issue has been resolved.
If you are unable to access the power menu, you can also perform a forced restart. This is typically done by holding down a combination of buttons specific to your device model. Consult your device’s user manual or manufacturer’s website for the correct button combination.
Checking for Software Updates
Outdated software can often lead to camera malfunctions. Checking for and installing the latest updates for your camera’s firmware, operating system, and related applications is a crucial troubleshooting step.
Camera Firmware: Most camera manufacturers provide firmware updates on their websites. Locate your specific camera model and download the latest firmware version. Follow the manufacturer’s instructions carefully when updating your camera’s firmware, as an incorrect installation could further damage the device.
Operating System: Ensure your computer or mobile device’s operating system is up-to-date. Outdated OS versions can cause compatibility issues with camera software and drivers. Check your system settings for available updates.
Camera Applications: If you’re using any third-party camera applications, verify that you’re using the latest version. These applications may also have updates available that address bugs or compatibility issues.
Testing the Camera in Safe Mode
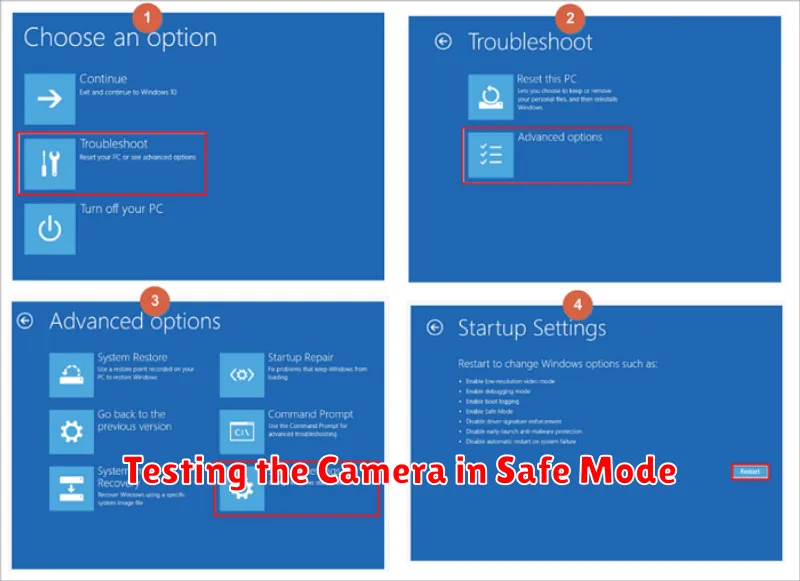
Safe mode is a diagnostic mode on your device that disables third-party apps and runs only essential system software. This helps determine if a recently installed app is interfering with your camera’s functionality.
To boot your device into safe mode, the process varies depending on the operating system. Consult your device’s documentation for the specific steps.
Once in safe mode, open your camera app. If the camera works correctly in safe mode, the problem likely stems from a third-party app. Uninstall recently installed apps one by one, testing the camera after each removal, to pinpoint the conflicting app.
If the camera still malfunctions in safe mode, the issue may be related to the operating system or hardware.
Hardware Issues and Repair Options
If software troubleshooting doesn’t resolve your camera issues, the problem might be hardware-related. Physical damage, such as a cracked lens or damaged connectors, can prevent the camera from functioning correctly. Internal component failures can also occur, especially in older devices.
Inspect your camera carefully for any signs of physical damage. If you find any, professional repair is likely necessary.
Connection problems can sometimes mimic hardware failures. Ensure the camera is securely connected to your device. If applicable, try a different cable or port.
For devices under warranty, contact the manufacturer for repair or replacement options. Out-of-warranty devices can be repaired by authorized service centers or third-party technicians, but weigh the cost of repair against the price of a new camera.
Tips for Preventing Future Camera Problems
Proper storage is crucial for maintaining your camera’s longevity. Store your camera in a cool, dry place away from extreme temperatures and humidity. Use a protective case or bag to shield it from dust, moisture, and impacts.
Handle with care. Avoid dropping your camera or subjecting it to unnecessary shocks. When changing lenses, do so in a clean, dust-free environment to prevent particles from entering the camera body.
Regular maintenance can prevent many common issues. Clean the lens and camera body regularly with appropriate cleaning tools. Inspect cables and connections for damage and replace them if necessary.
Battery care contributes to camera performance. Avoid completely depleting the battery before recharging. Remove the battery when the camera is not in use for extended periods. Use only the recommended charger for your camera model.