
Mastering the proper insertion of a memory card, also known as an SD card (Secure Digital card), into your Android device is crucial for expanding storage capacity and enabling seamless transfer of data. Whether you’re a new Android user or simply seeking a refresher, this comprehensive guide will provide a step-by-step approach to memory card insertion, ensuring a smooth and error-free process. Understanding the nuances of SD card installation can prevent potential damage to both your device and the memory card itself. This guide will cover various Android devices and memory card types, empowering you to confidently manage your device’s storage.
This step-by-step guide addresses common challenges encountered during memory card insertion on Android devices, such as improper alignment, incorrect orientation, or unrecognized cards. By following these clear instructions, you’ll be able to avoid potential pitfalls and optimize your Android experience. Learn how to correctly insert, remove, and troubleshoot SD card issues, ultimately mastering memory card insertion on your Android device. This tutorial will equip you with the knowledge to confidently handle memory cards and maximize your device’s storage potential.
Identifying the Memory Card Slot on Your Android Device
Locating the memory card slot is the first step to expanding your Android device’s storage. Most modern Android devices utilize a small tray, often called a SIM tray, that houses both the SIM card and the microSD card. This tray is typically located on one of the edges of the device.
Common Locations
The most common locations for the memory card slot include:
- The top edge: Less common in newer models, but some older Android devices featured the tray on the top.
- The right side: A frequent location for the SIM/microSD tray, often near the power button.
- The left side: Similar to the right side, the left edge can also house the tray, usually towards the top or middle.
- The bottom edge (less common): While rare, some devices may incorporate the tray on the bottom edge alongside charging ports.
Consult your device’s user manual or the manufacturer’s website for the precise location of the memory card slot if you are unsure.
Identifying the Tray
The tray itself is usually a small, rectangular slot with a tiny pinhole. This pinhole is used to eject the tray.
Preparing Your Memory Card for Insertion
Before inserting your memory card, it’s crucial to prepare it properly to ensure compatibility and prevent data loss. Check the memory card’s format. Most Android devices support the FAT32 or exFAT file systems. If your card uses a different format, you’ll need to reformat it, which will erase all existing data. Ensure you have backed up any important files beforehand.
Gently wipe the memory card’s gold contacts with a clean, dry microfiber cloth. This removes any dust or debris that might interfere with the connection. Avoid using liquids or abrasive materials.
If your memory card is brand new, you may need to initialize it through your computer or another compatible device. This process prepares the card for use and may be necessary before your Android device recognizes it.
Properly Inserting the Memory Card
Once you’ve identified the memory card slot and prepared your card, it’s time for insertion. Gentle and precise movements are crucial to avoid damaging the card or the slot.
Orient the memory card correctly. Look for the notch on the side of the card. This notch corresponds to a small ridge within the slot and ensures proper alignment. Align the notch with the ridge and gently slide the card into the slot.
You should feel a slight click as the card locks into place. This indicates the card is fully inserted and secure. Avoid forcing the card if it doesn’t slide in easily. Double-check the orientation and try again. Excessive force can cause damage.
After insertion, you should receive a notification on your Android device acknowledging the new memory card. This notification will typically give you options for how to use the card, such as for portable storage or internal storage (depending on your Android version and device).
Troubleshooting Memory Card Insertion Issues
Sometimes, you might encounter issues when inserting your memory card. Here are some common problems and solutions:
Card Not Detected
If your Android device doesn’t detect the card, ensure it’s inserted correctly. Remove and reinsert it, making sure it clicks into place. Check the card’s contacts for any debris or damage. Try the card in another compatible device to rule out a device malfunction.
Card is Read-Only
A read-only card prevents you from saving new data. Check for a physical lock switch on the side of the memory card and ensure it’s in the unlocked position. If the problem persists, try formatting the card (be aware this erases all data).
Incorrect Format
An incorrectly formatted card may also cause issues. If your device prompts you to format the card, it’s likely in an incompatible format. Back up any important data before proceeding with formatting.
Formatting Your Memory Card for Optimal Use
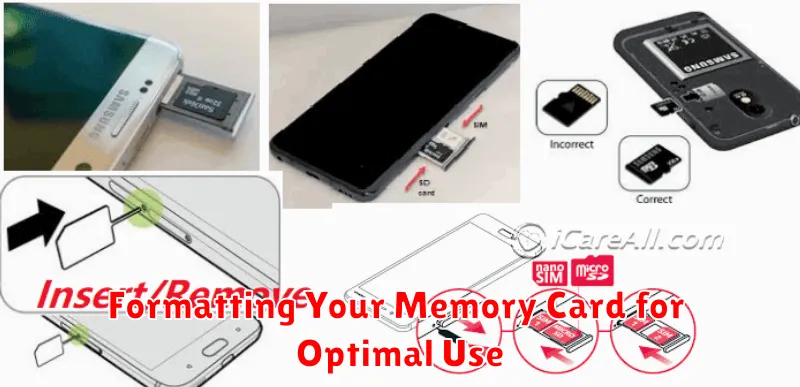
Formatting your memory card can resolve performance issues and ensure compatibility with your Android device. It’s important to understand that formatting will erase all data on the card, so back up any important files beforehand.
To format your memory card, navigate to your device’s Settings. The exact steps may vary depending on your Android version and device manufacturer, but generally, you’ll find storage options within the settings menu. Look for options labeled “Storage” or “SD & phone storage.”
Once you’ve located your memory card within the storage settings, select it. You should see an option to format the card. Tap this option and confirm your choice. Your Android device will then format the memory card, preparing it for optimal use.
After formatting, the memory card will be ready to store apps, photos, videos, and other files. You can now move files to the card to free up space on your device’s internal storage.
Transferring Files to and from Your Memory Card
Transferring files between your Android device and your memory card is a straightforward process. Connect your device to your computer. Your device should appear as a storage device.
Locate your memory card within your device’s file structure. It might be labeled as “SD Card” or similar. Open the memory card folder to view its contents.
To transfer files from your computer to the memory card, simply drag and drop the desired files into the appropriate folder on the memory card. Conversely, to transfer files from the memory card to your computer, drag and drop the files from the memory card to the desired location on your computer.
Always safely eject or unmount both your Android device and the memory card from your computer after completing file transfers. This practice prevents data corruption and ensures file integrity.
Safely Removing Your Memory Card from Your Device
Improper removal of your memory card can lead to data corruption or damage to the card itself. Follow these steps to safely eject your memory card on your Android device.
First, unmount the SD card. This tells the system you are about to remove the card and prevents data loss. Locate the storage settings within your device’s settings menu. The exact wording may vary depending on your Android version, but look for options like “Storage” or “SD & phone storage.” Within this menu, find your SD card and select the “Unmount” or “Eject” option.
Once the card is unmounted, you can physically remove it. Power off your device or enable Airplane Mode. This minimizes the risk of data corruption during removal. Locate the memory card slot on your device. This may be a small tray that requires a pin to eject or a slot that allows direct access to the card.
Gently remove the memory card from the slot. If using a tray, carefully pull the tray out. If the slot is accessible, lightly push the memory card inward to release it. Then, pull the card out.
Tips for Maintaining Your Memory Card’s Performance

Maintaining your memory card’s performance ensures smooth operation and prolongs its lifespan. Follow these tips for optimal results.
Regular Formatting
Format your memory card periodically using your Android device. This helps to eliminate minor errors and maintain optimal performance. Do not use third-party apps or format on a computer, as this can sometimes create compatibility issues.
Avoid Filling to Capacity
While convenient, filling your memory card to its maximum capacity can sometimes slightly reduce performance. Leaving a small amount of free space can help maintain optimal read and write speeds.
Safe Removal Practices
Always unmount or eject your memory card using the appropriate Android system settings before physically removing it. This prevents data corruption and potential errors.
High-Quality Cards
Invest in high-quality memory cards from reputable brands. Higher quality cards often offer better performance and durability, contributing to a longer lifespan and smoother operation.